Handling Form events
Handling Form events.
Handling events with React elements is very similar to handling events on DOM elements. There are some syntax differences: React events are named using camelCase, rather than lowercase. With JSX you pass a function as the event handler, rather than a string.
Let’s learn it with an example of how to capture input from form elements like <input>, <textarea> and <select> tags and have the data available for the form submission. In regular HTML, form elements like <input>, <textarea> and so on are responsible for handling their own user input and updating the respective values. But what we want is to react to control the form elements instead. Such form elements whose value is controlled by react is called Controlled component.
Consider a form element. For an example let’s take an <input> element, it looks like this.
<input type="text" value="" onChange="" />
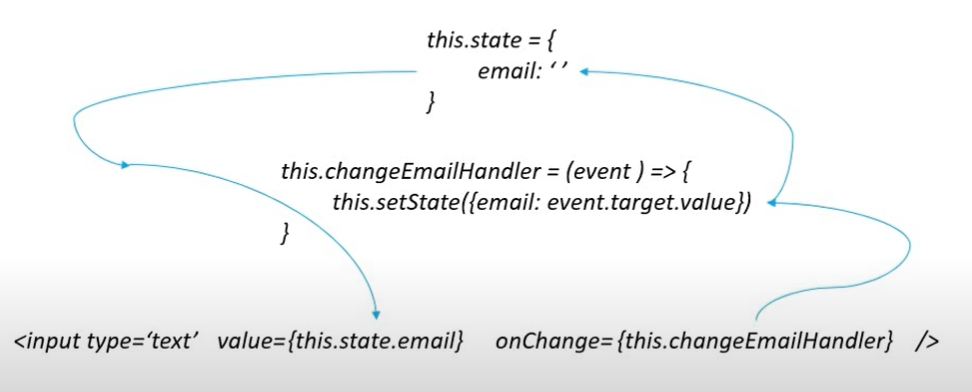
This <input> element has a value, that value will also change depending on user interaction. If a user enters some data in a <input> tag and how we are going to handle those value changes within the component is with use ‘state’ and ‘setState’. So in the controlled component the value of the input field is set to the state property. The next thing that we need is the onChange event getting fired whenever a change in the input field value. In that onChange handler we use the setState method to update the state. When the state gets updated the render method is called and the new state is assigned as a value to the input element. This is how the data will be updated in a form element.
So actually there is a life cycle that goes. First it sets the initial value from the state and propagates the changed value to the state and then back to the input field. The figure below will help to understand the flow.

This is what happens when we take in the case of any form elements.
Now let’s look at how form submission happens. React will always have access to that component state which reflects the updated values of the form elements. That state object can then be used to submit the form data when needed.
Let’s look at the code below to understand the working flow.
class FormName extends React.Component {
  constructor(props) {
    super(props);
    this.state = {value: ''};
    this.handleChange = this.handleChange.bind(this);
    this.handleSubmit = this.handleSubmit.bind(this);
  }
  handleChange(event) {
    this.setState({value: event.target.value});
  }
  handleSubmit(event) {
    console.log('A name was submitted: ' + this.state.value);
    event.preventDefault();
  }
  render() {
    return (
      <form onSubmit={this.handleSubmit}>
        <label>
          Name:
          <input
            type="text"
            value={this.state.value}
            onChange={this.handleChange}
          />
        </label>
        <input type="submit" value="Submit" />
      </form>
    );
  }
}
The example above is triggered on form submit. Same we can do in the case of clicking a button also. The event that triggered on that time is onClick. On click we need to trigger the function to save. The form submit will have default browser behavior that the date will flush out after submission of the form. To avoid that, we need to add event.preventDefault while submitting the form. This will prevent the default behavior of form submission.
We can validate the form the same as how we validate on javascript also. If you’re looking for a complete solution including validation, keeping track of the visited fields, and handling form submission, Formik is one of the popular choices. However, it is built on the same principles of controlled components and managing state.